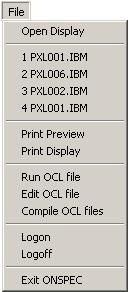
The File pull-down menu contains commands to do file related actions. The following paragraphs explain how to use each of the commands in this menu along with showing the smart icon associated with the command.
Open Display

The Open Display command allows you to change the graphics display currently being viewed. When this command is selected you are presented with a dialog box containing a list of the current displays (PXL*.IBM files) found in the Displays Directory. (See Environment Variables for information on setting the Displays Directory.)
The current display is automatically selected. To open a different display, select it from the list and press OK.
A check box option in the dialog allows you to show the descriptions saved in the display file. When this option is selected the list will take longer to fill but you will have information about the display you wish to open.
Print Preview

The Print Preview command allows you to preview the current display as it will be printed.
Print Display

The Print Display command allows you to print the current display. If no printer has been set with a startup option or through the printer setup, the default printer set in the system will be used. It is advisable to use the printer setup before printing to set scaling and positioning options. (See Printer Setup.)
Run OCL File

The Run OCL file command allows you to select and execute a file of OCL commands. When this command is selected, a file dialog box is presented. From this dialog box you can select a file to run from a list of drives, directories, and files. You can optionally enter the filename directly into the File name entry field. After selecting the file you wish to execute, press the Open button to run the file. Double clicking on a file name in the file list automatically selects and runs that file.
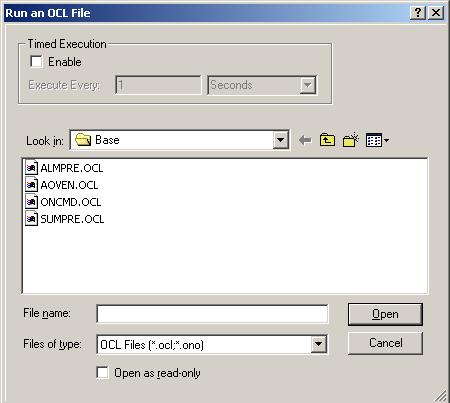
By default the commands in the file are executed once. To run the commands multiple times use the Timed Execution option.
Above the file information is an optional Timed Execution section.

This gives you the ability to execute the commands in the OCL file on a timed basis. When the check box is enabled you can set to execute every:
- 1 - 10000 Seconds
- 1 - 10000 Minutes
- 1 - 10000 Hours
- Each Display Refresh. (Based on display refresh rate, see Refresh Rate.)
Edit OCL File

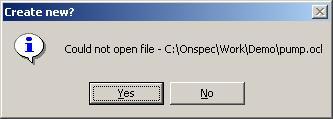
The Edit OCL File command allows you to select and edit a text file of OCL commands. When this command is selected a file dialog box is presented for selecting the OCL file to edit.
Select the file you wish to edit from the file list or type the name of a file into the Open Filename entry field.
If you type in the name of a nonexistent file in the File name entry field and press Open, a message box will appear telling us that the file could not be opened and asks if we would like to create it.
Once a file has been selected it is read into the OCL editor dialog.
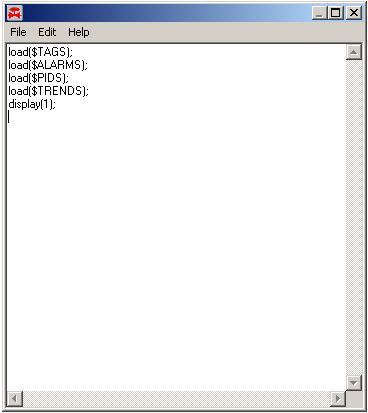
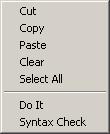
The OCL editor dialog allows you to edit, check syntax, save, and even run your OCL commands. If you press the right mouse button while in the editor a menu will pop-up with the option available for the editor.
CutDeletes the selected text and stores it in the clipboard where it can be retrieved at a later time. To select text hold the left mouse button down while moving the text input cursor. This function can also be accomplished by pressing the X key while holding down the CTRL key.
CopyCopies the selected text to the clipboard without effecting the text. This function can also be accomplished by pressing the C key while holding down the CTRL key.
PasteInserts text from the clipboard at the current text input cursor position. This function can also be accomplished by pressing the V key while holding down the CTRL key.
ClearDeletes the selected text (does not store text). This function can also be accomplished by pressing the DELETE key.
Select allSelects all of the text in the editor. You can then perform some action on this text. (For example, you could copy all the text to the clipboard or do a Check Syntax.)
Do itExecutes the selected text if it successfully passes the syntax check; otherwise, a message box will appear giving the approximate line number of the error.
Check SyntaxChecks if the selected text is free of errors which would cause it not to execute. If an error occurs during the syntax check a message box will appear showing the approximate line number of the error.
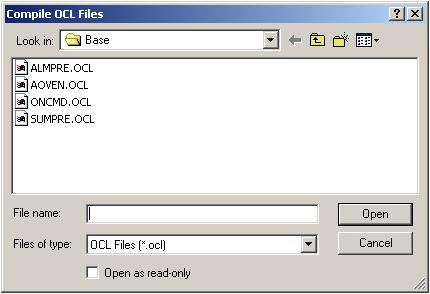
Compile OCL Files

If you would like to hide your OCL source or prevent someone from modifying it, you can compile the source to an OCL Object File (.ONO). The Object file can be run by the Run OCL menu or by using the ExeFile function.
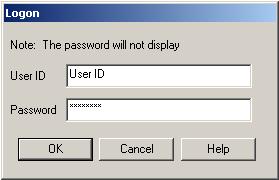
Logon

The Logon option allows you to set the current global security level shared by most ONSPEC applications.
When the logon option is selected a dialog box will be presented which prompts for a User ID and Password. Click in the entry fields and type in your account information.
Note: Only asterisks ( * ) will appear in the password entry field. Click on OK to submit the Logon request or Cancel to exit the dialog without logging on.
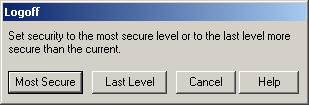
Logoff

The Logoff command may perform one of two functions depending on the security level of the previously logged on user.
1. If no user was logged on before the current user or if the previously logged on user had a more privileged level then logoff will automatically set the security level to the most secure level.
2. If a user with a less privileged level was logged on previously logoff will present a dialog asking if the level should be set to the most secure or to the previously set level.
If the security level is set to a level greater than or equal to the lock level (default 7) all ONSPEC applications will lock their windows, and the following buttons will be disabled:
System Menu 
Minimize 
Maximize 
A locked window cannot be moved or sized. The lock level can be changed using the OCL function lockLevel(n) where n is the security level to lock on. For more information on OCL see the ONSPEC Command Language User Guide.
Note: User ID and Password accounts are created by the Passedit program, located in the ONSPEC default directory (you may wish to remove passedit.exe from this directory in a running system). To create accounts, run Passedit from a system prompt or use the Start a Program option in the Run pull-down menu. Each account is assigned a security level which ranges from 0 – 9 (0 being the most secure level).
All of the ONSPEC menu options and smart icons can be set to a certain security level (see the ONConfig User Guide section on ONSPEC Initialization). That means that a user, in order to use a menu option, must logon at a security level equal to or less than the level set for that option. For more information on Passedit see the section on Using Passedit.
Security Levels are also assigned to changeable objects and Function Keys when they are configured in ONBuild.
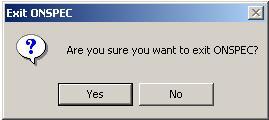
Exit ONSPEC

The Exit ONSPEC command closes the ONSPEC window. If this is the main ONSPEC (first ONSPEC run), all drivers, the alarm processor, and history processor will be closed as well. Before closing the window you will be asked for confirmation.