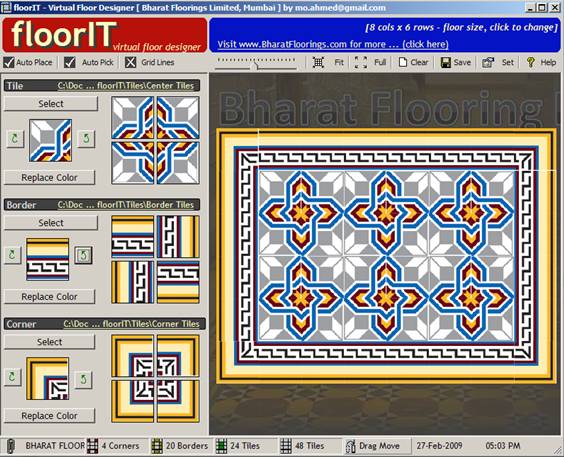
floorIT ( virtual floor designer )
The application floorIT is complete floor Designing Software developed for Bharat Flooring and Tiles Mumbai.
Case Study ( Problems Statement )
In order to over cum the cumberson task of designing each floor using different tiles and patterns was taking and extensive amount of time and resources. Since the client had to wait for a day or so in order to view the results and revert changes the process was very tedious.
To over cum this situations HMI Tech developed the instant floor designing software, floorIT. The application could change the floor design, shape and colors at a touch of a button. This greatly reduced the design and planning time thereby increasing efficency.
Solution ( floorIT application )
floorIT is a virtual floor simulator which takes images of tiles and places then so that the user can visualize the floor. floorIT will rotate and place each tile on the floor such the all the patterns of the tiles match.
It’s so simple …
-
Start the program
-
Select any Tile, Border and Corner Image
- You have a floor !
1) Floor layout Basics
All floors are designed by placing center tiles, border tiles and corner tiles. floorIT allows users to manually drag and drop any files to create a really custom floor. Remember that you can always drag and drop even if you have set floorIT to automatically place the tiles.
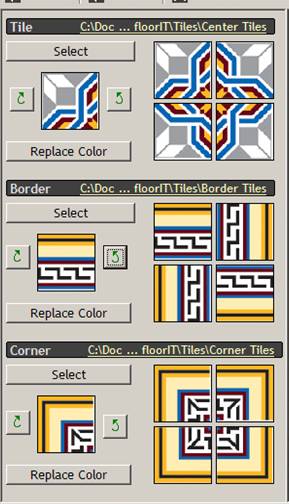
i) Center Tile
Are the tiles which are placed in the center of the floor. Each tile is placed, rotated by 90 Degrees and placed again and again.
ii) Border Tiles
Are the tiles which appear at the border of Border of the floor. Each Tile is rotated by 90 Degrees for each side of the border.
iii) Corner Tile
Are the tiles which appear at the corner of the floor. Each Tiles is rotated by 90 Degrees and placed at each corner.
2) Overview
3) Options
i) Floor Size
Reset the size of the floor by specifying the number of rows and cols. The values are limited to a value between 1 and 18. Note that if you have manually placed any tiles then they will be cleared. If Auto Place is not selected then the floor will become empty.
ii) Auto Place
Automatically rotate and place the tiles on the floor. If you do not select this option then you must manually place each tile by dragging and dropping on the floor from and of images displayed in floorIT or windows explorer.
iii) Auto Pick
Automatically looks for other tiles which match the pattern. The pattern is as follows:
- <Filename>a.<ext> mosaica.bmp Center Tile
- <Filename>b.<ext> mosaicb.bmp Border Tile
- <Filename>c.<ext> mosaicc.bmp Corner Tile
floorIT will look in the same path where the first file is selected from and also in the predefined path as set in the setting window.
iv) Grid
Shows or Hides the Gridlines between the tiles.
4) Tile Controls
i) Select
Used to select any file. The default path of the dialog is the path specified in the settings. You can also click the path to open windows explorer to drag and drop files into floorIT. Drag and Drop is the same as selecting the files using the select button.
ii) Rotate
Use to correct the rotation of the tile. When you correct the rotation of the main image all the subsequent images are also rotated. By rotating a tile you can create many different designs using the same tiles.
iii) Recolor
Use this option to recolor a tile. Only tiles with 8 or less colors can be re-colored.
5) Commands
i) Zoom
Adjust the zoom to make the floor larger or smaller.
ii) Fit
Adjust the zoom such that the entire floor is visible without any scroll bars.
iii) Full
Toggles the full screen mode. You can also toggle the full screen mode by double clicking the background.
iv) Save
Saves the floor as a jpg file.
v) Set
Adjust the default folder locations for the tiles, borders and corners.
vi) Help
Display this page.
6) Status Bar Panels
i) Copyright
Display the copyright information.
ii) Center Tiles
Display the total number of center tiles used on the floor.
iii) Border Tiles
Display the total number of border tiles used on the floor.
iv) Corner Tiles
Display the total number of corner tiles used on the floor.
v) Total Tiles
Display the total number of tiles used on the floor.
vi) Drag Copy / Move
Toggles between drag copy and drag move mode. If you drag move a tile inside the floor then the tile will be moved, i.e. It will occupy the new position and its old position will be replaced by an empty tile. If you drag copy then a copy of the image will be moved to new position and the old position will still retain the image.
vii) Date & Time
Display the date and time.
7) Credits
Special thanks to:
(1) Firdaus Variava, Director – Bharat Floorings Limited.
(2) Ashiana Massonary , Partner – The Big Picture.
Developed by: Mohd Ahmed, Director – HMI Technologies Private Limited.
Now the clients of Bharat Floorings and Tiles can see what final floor will look like instantly.
Screen Shots
Features
Screencast